Burning candles can be hard. It might not seem like it, but these little beauties can be tough to get juuuuuust right. Whether you have the finished product in hand, or you're pouring your own via one of our workshops or at-home kits - these tricks of the trade will help ensure your candles happy and healthy!
First things first, tunneling (when wax remains around the edges while your candle burns down in the middle) is THE WORST! We know. We get it.
Our first tip is simply to light your candle up for a long time on the first burn. And by a long time, we mean a LONG time. It could be 4 hours until the total area of your candle has melted, it could also be 6. This is why it might be a good idea to light your candle up the first time in the morning or in the afternoon: it allows you to have a few hours to burn it, before you go to sleep. See our guide below for how long your candle might need based on its diameter. (Keep in mind this is just a rough guide!)
INITIAL BURN TIMES BY CANDLE WIDTH
1inch / 1 hour
2inch / 2 hours
3inch / 3 hours
4inch / 4 hours
5inch / 5 hours
6inch / 6 hours
1inch / 1 hour
2inch / 2 hours
3inch / 3 hours
4inch / 4 hours
5inch / 5 hours
6inch / 6 hours
Another potential problem you may encounter is called a sinkhole.
A sinkhole is a hidden cavity within your candle often next to the wick and is another major culprit of tunneling. Unfortunately, there can be sink holes in your candles that you might not even realize are there because you cannot see them, and only when the candle is being burned will the dreaded sinkhole be discovered. Sometimes you can find them by the wax pulling away from the wick, creating a small or even large air cavity within the candle. Other times, you might think you see only a small sink hole, while hiding beneath it is actually quite large. Needless to say, sink holes are unpredictable and can be a huge problem! There are techniques you can use to try to avoid sink holes such as:
- Heating the glass before pouring. As the wax cools, it contracts and holds onto the wick and the glass, thus creating the cavity. If the glass is warm, it will slow the cooling and also help the wax not to cling to the side and slide down the glass as it sets.
- Poking relief holes as the candle is cooling also helps to prevent the air pockets from forming. Our preferred method is to poke relief holes as the candle cools. We poke several holes around the wick using a chopstick or your thermometer probe and then finish the candle with a heat gun or top pour by saving a bit of the wax and fragrance from your pitcher (you may need to reheat it slightly). With certain waxes we have not had any issues with sink holes forming, yet with other waxes it seems to happen frequently. 100% soy is often a culprit.
Now you know how to avoid these issues, but let us help you fix the tunnel that is already there!
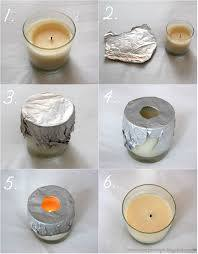
You can get rid of that unsightly tunnel by folding a piece of aluminum foil in half, wrapping it around the candle, and puncturing a hole over the flame like a tent (leaving a hole for it to get oxygen). Keep the foil on for about 30 minutes, and all of that built-up wax should be melted off the sides. If you have a sinkhole causing the tunnel, puncture the hole with your thermometer probe or a chopstick before lighting the wick. This will open up space so that wax can fill in the hole and cover the tunnel. Once the hole has filled in, blow out your candle and let it cool and you should be all set. Just make sure you utilize the first burn rule above on your next burn. See this example:

If your candle has any holes or bubbles on the surface TRY this quick trick. Using a blow dryer on its low setting, begin making a circular motion around the surface of the candle (about 3 inches above the surface) for about one minute, then let it cool. Now your wax should be smooth enough to skate on, although maybe don't. 🙃
Enjoy having the happiest and healthiest candles in town!!

